How Do You Upload a Cd to You Tube
Eugene writes a variety of articles on the Maven coalition network of sites, covering topics such every bit gardening, DIY, photography, and STEM.

How many audio CDs have you lot got? 10, 100? m? Wouldn't it be prissy to have your unabridged music collection at your fingertips on your phone, tablet or notebook computer? YouTube Music allows you to practice this and the steps to uploading music from your CDs to the cloud are reasonably straightforward and something you lot could do on i of those rainy days!
What Are the Steps to Getting Your Music Collection Online?
- Rip the CDs using iTunes, Audio Grabber, Microsoft Media Player or like software.
- Upload the tracks from hard drive or flash retentivity to the YouTube Music website
- One time the tracks are online, they tin can be accessed from a desktop reckoner or mobile device
What Does "Ripping" a CD Mean?
Ripping music from a CD refers to extracting the digital audio sound tracks from the disk and saving this music information (e.g. in the form of an MP3 file) on another CD, PC, mobile device or mobile music player.
Is Ripping Tracks from a CD Legal?
It depends on the state. Copying CDs and giving the re-create to a friend or giving them the copy so they can brand their own is a definite copyright violation and illegal. Putting music tracks on a website and sharing your collection is as well illegal. Making backups for your own personal use is a more fuzzy area. In many countries a levy is paid to content producers to compensate them for whatever loss due to copying. The situation is dissimilar in the Britain notwithstanding. Legislation in Oct 2014 made it legal to rip CDs for fill-in purposes or "format shift" so y'all could play the MP3s on your phone or PC. At present that legislation has been overturned and it's illegal to do and so. In the US, according to the RIAA, it's ok to copy content onto an Audio CD for personal apply and:
"...transferring a re-create onto your figurer hard drive or your portable music player, won't normally raise concerns and so long equally....The re-create is made from an authorized original CD that yous legitimately own...."
How to Rip CDs
Step ane. Install iTunes or Other Ripping Software
There are several well known media player applications that tin be used for listening to CDs, MP3 or other format audio files, podcasts, Cyberspace radio stations, watching videos or movies and direction of a music collection. ITunes is just 1 of these and it's very like shooting fish in a barrel to utilize. ITunes tin also rip CDs or excerpt the tracks off them and shop those tracks as files on your computer. You can download iTunes from the Apple website hither:
Apple iTunes download
Once tracks are imported, they terminate upward in your iTunes library.
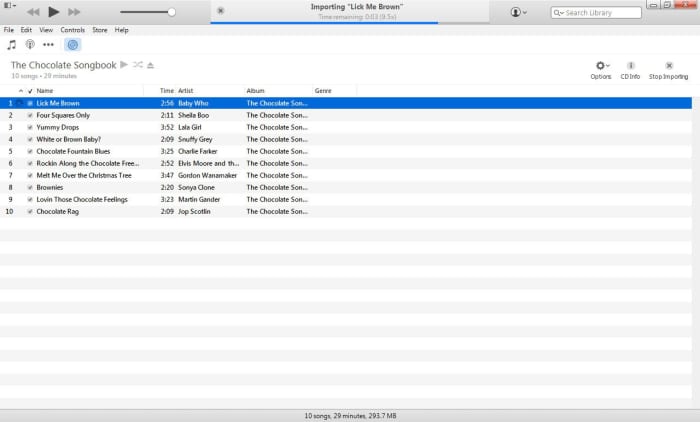
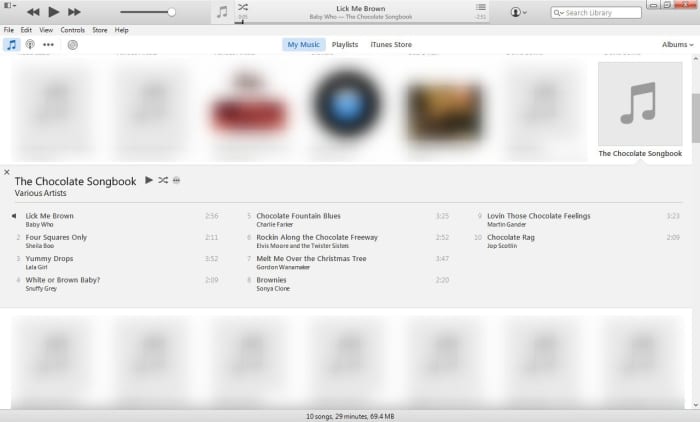
The iTunes Music Library Screen
This differs somewhat betwixt versions. The starting time screen capture shows an older version I used to rip a CD. The reason it's older is because the laptop I used runs Windows Vista and has a CD drive. Information technology'southward the last version of iTunes for that operating system. Newer desktops and laptop computers don't normally accept integrated CD/DVD drives, but you can buy an external 1 that plugs into a USB port. The second screen capture shows what the latest version of iTunes now looks like on Windows 10.
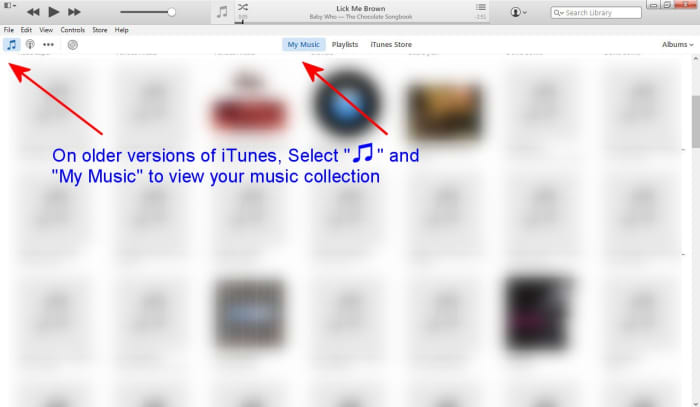
Viewing albums in iTunes on Windows Vista.
© Eugene Brennan

Viewing albums in iTunes on Windows 10. Cull "Music" from the popup carte on the peak left of the screen and and then click "Library".
© Eugene Brennan
Pace 2. Insert a CD
When yous insert a CD which iTunes hasn't seen earlier before, it starts retrieving information nigh the disk from an Internet database. This information or metadata includes attributes such as the CD title, anthology creative person, track names, track artists, genre etc. CDs are effectively "dumb" and an development of the vinyl record, but containing bumps or pits on a spiral track to represent stored bits of digital data. They don't normally have any title or track info actually stored onboard in a file, because originally they were designed for players that didn't accept the technology to admission, decode and display this type of information. Newer compact disks possibly may have metadata stored on the deejay itself. One time metadata is retrieved, a list of tracks is displayed and iTunes prompts yous with a dialog every bit to whether it should import the CD.
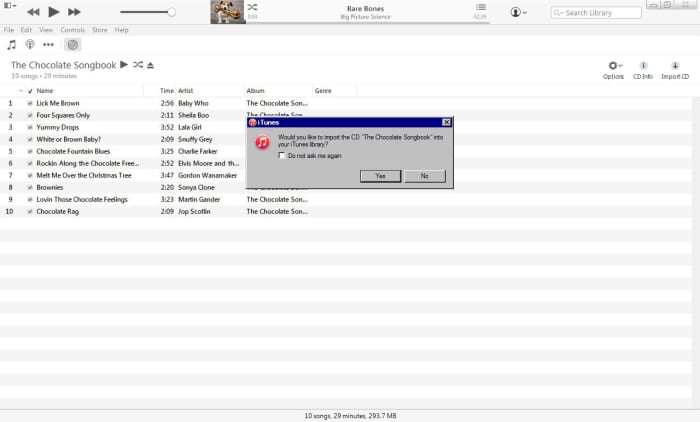
When you lot insert a CD that iTunes hasn't encountered before, it retrieves metadata from the Internet about the CD title, rail names etc.It also prompts yous to import the CD onto your computer.
© Eugene Brennan
Step iii. Earlier Importing, Choose Import Settings
ITunes will use default import settings for tracks that information technology rips from CDs and stores as files in MP3 or other format on your computer. If y'all want to change these settings, click "Cancel" when prompted to import so click "Import CD" on the toolbar which brings up the import options dialog. If you don't come across this push button, click on the icon on the toolbar which looks like a CD, to bring you to the screen which displays a listing of the tracks on the disk.
File Formats:
Roll to Continue
Tracks extracted from a CD tin can be encoded and stored on disk using several formats, but MP3 and AAC are the almost useful. AAC files are the successor to MP3 and offering better sound quality at the same bit charge per unit, only MP3 is more universally playable on a range of music devices. Both are lossy formats which means that raw uncompressed digital sound data from a CD is compressed using algorithms to get in smaller and take upwardly less file space. In the process, information is thrown away. By choosing dissimilar flake rates and sample rates, you get a tradeoff between file size and audio quality.
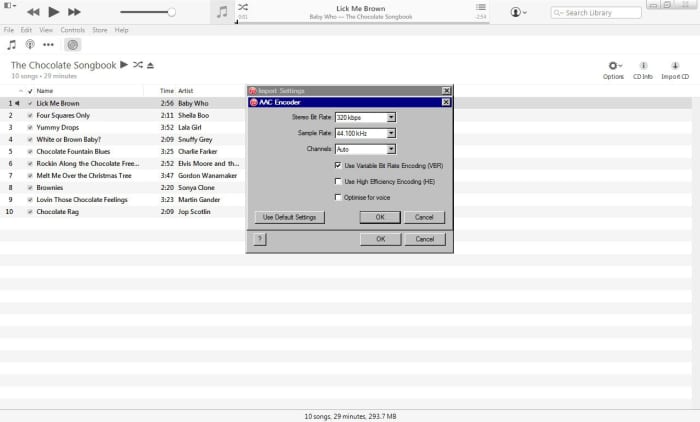
On the "Import Settings" dialog that appears, cull the file format from the "Import Using" drop downwardly card, and so pick "Custom" from the "Setting" drop downwards menu.
Alternatively Select "Edit" -> "Preferences" from the iTunes menu and then click the "Import Settings" button on the dialog.

When you click on "Import CD", this dialog appears.
© Eugene Brennan
Once yous select custom, a second dialog box appears where you can gear up the sample and bitrates.
When y'all pick "custom" from the drib downwards bill of fare, a second dialog appears.
© Eugene Brennan
Choice the bitrate from the drop downwards menu. 320 kbps (kilo bits per second) at 44.1 kHz is CD quality audio, typically resulting in 4 to 12 MB per track. The downside of highest quality is larger files that take up more space on your computer or mobile device.
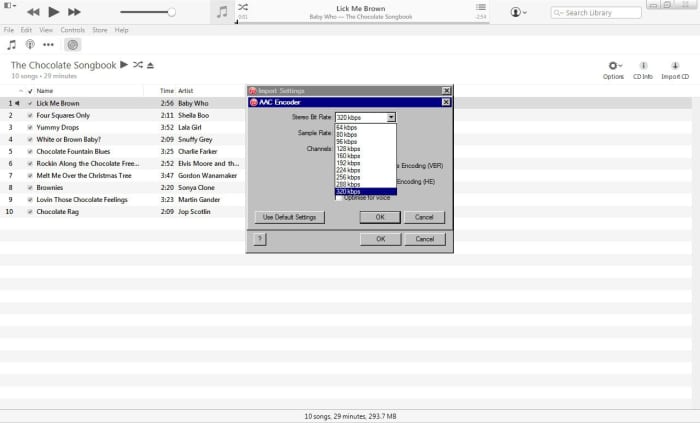
Selection the sample and bitrates. 320 kbps gives CD quality sound, but produces the largest files on disk.
© Eugene Brennan
Step 4. Importing CD Tracks
Once y'all've finished changing storage settings, iTunes will commence the import and encoding process, creating files on disk.
Once you've exited the setting dialog, iTunes starts importing and saving files.
© Eugene Brennan
The imported CD appears in "My Music" or "Library", depending on iTunes version. This is how it looks on an older version of iTunes.....
© Eugene Brennan
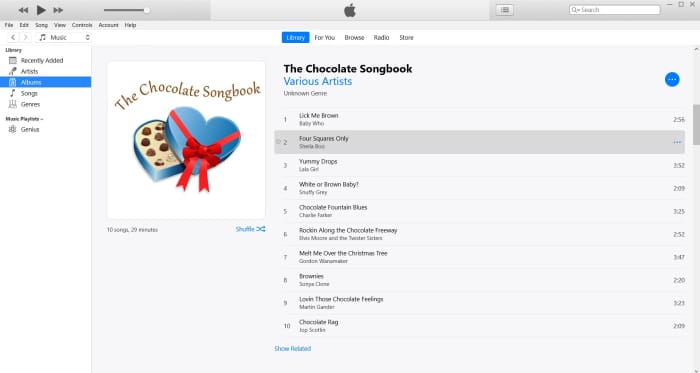
....and this is how information technology appears on the latest version of iTunes for Windows 10.
© Eugene Brennan

© Eugene Brennan
How to Upload Music to the Cloud
Steps to uploading MP3 or AAC files to YouTube Music.
To notice where your music tracks accept ended upwards on your estimator, select "Edit" and and then "Preferences" from the iTunes carte du jour. This brings up the settings dialog. Click on the "Advanced" button on the dialog toolbar. The media storage location is shown at the top of the dialog. By default, the storage location is driveletter:\Users\userprofilename\Music\iTunes\iTunes Media. So if the drive letter is "C" and your Windows user profile name is joebloggs, the folder location would be
c:\Users\joebloggs\Music\iTunes\iTunes Media
Another way of finding your media binder is past using the Windows File Explorer system utility. In Windows x, the iTunes media binder is located under "This PC" > "Music" > "iTunes" and called "ITunesMedia".
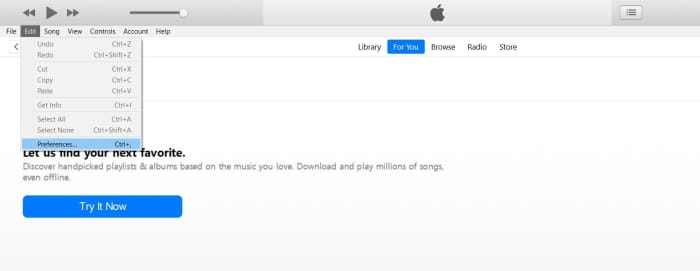
To find where music tracks are stored on your computer, first click "Edit" on the main menu so "Preferences"....
© Eugene Brennan

So click the "Advanced" push button on the toolbar. The media folder location is shown at the tiptop of the dialog.
© Eugene Brennan
Stride 2. Browse to the Youtube Music Website
Using your browser, navigate to the Youtube Music website at music.youtube.com.
Annals on the website if yous haven't done so already.
Stride 3. First Uploading Files
Click on your profile avatar in the top right corner of the screen and select "Upload Music" on the dialog box that appears.
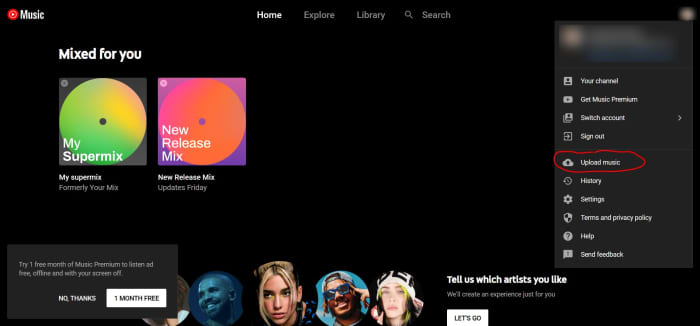
Click on your profile avatar at the top right of screen and and so click "Upload files".
© Eugene Brennan
Step 4. Select Files for Upload
Once you select "Upload Music", iTunes will open a dialog window asking you which files you want to upload. In this file upload dialog, navigate to the iTunes media binder that you identified earlier in this guide and find the sub folder corresponding to the album you extracted from the CD. Open up the folder past clicking on its proper name. Highlight all the files you lot want to upload (simply depict a rectangle effectually them with your mouse) and click the "Open up" button.
How practise I know the name of the folder corresponding to my anthology?
ITunes creates a new folder for each CD it rips tracks from. Starting time information technology creates a new sub folder under the "iTunes Media" binder (iTunes Music on older versions of iTunes) named after the anthology creative person. Adjacent it creates a sub folder off that binder, named later on the CD title. If additional CDs by the aforementioned album artist are ripped, further sub folders are created off the artist's folder. Compilation albums are stored somewhat differently. Because the metadata of my "The Chocolate Songbook" album specifies it as a compilation, information technology's stored in a special "Compilation" folder for these type of CDs, and a subfolder chosen "The Chocolate Songbook" stored in this.
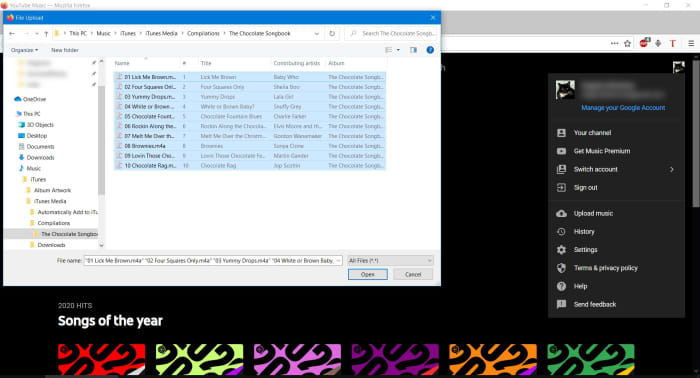
Navigate to the iTunes media folder and highlight files.
© Eugene Brennan
Footstep 5. Look for Files to Upload.
Depending on your Cyberspace connectedness speed, it can take from seconds to a infinitesimal for files to upload. In one case upload is complete, you can view the album past selecting "Library" on the menu and then "uploads" from the drop down menu.
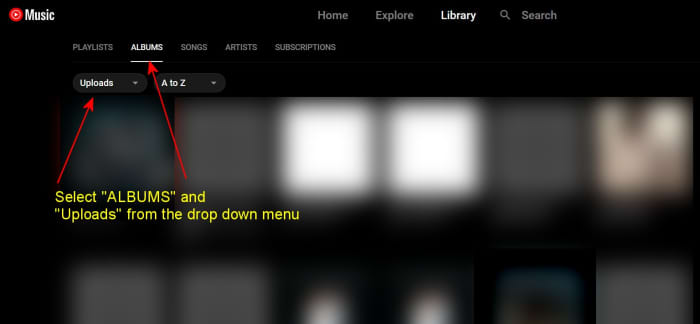
Navigate to the albums screen.
© Eugene Brennan
Your album appears in a filigree of albums you may accept uploaded previously. Click on the album to view and play the tracks.
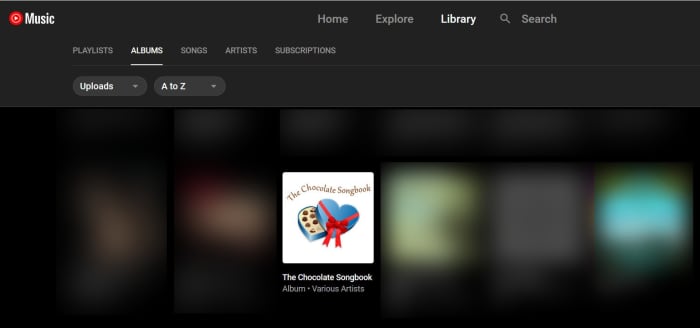
Your anthology is displayed forth with other uploaded albums.
© Eugene Brennan
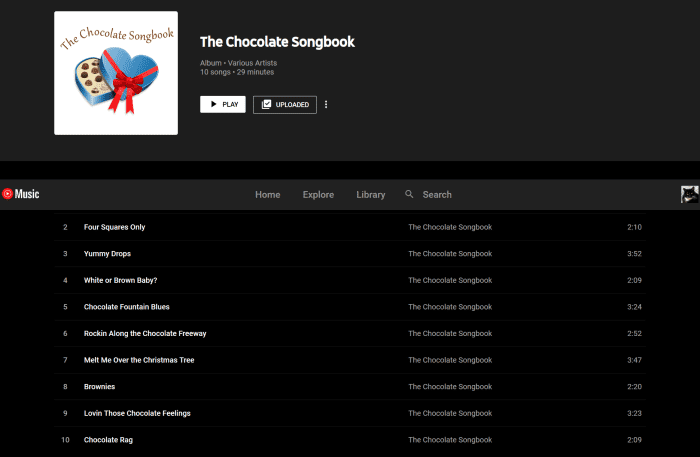
Click on the album artwork to view and play tracks.
© Eugene Brennan
What If I Don't Have a CD Drive in My Computer?
Nigh laptops no longer come equipped with a CD/DVD drive. They've pretty much become obsolete similar a lot of computer hardware every bit new applied science has become available. Software applications used to exist provided on a CD because the files were too large to download over the Net. Now that'south not an issue as connectedness speeds have increased dramatically since the days of dial-upward Internet. Also many people now stream music and movies online, so sound CDs and DVDs are no longer the only choice for listening and viewing. You can buy a CD/DVD read/write drive that plugs into a USB port similar this 1 from LG Electronics, available on Amazon. Information technology has a 24x CD write speed and 8x speed for writing DVDRs. The drive has a USB two.0 interface which is also compatible with USB 3.0 ports (sometimes marked with "SS" or a blue connector slice).
References:
HowStuffWorks: How MP3 Files Work
SoundBridge: Audio Formats and File Types
Diffen: AAC vs MP3
How-to Geek: Do Music CDs Contain the Necessary Metadata for the Tracks on Them?
RIAA: Almost Piracy
The Guardian: High court quashes regulations allowing people to copy CDs
Wikipedia: Individual Copying Levy
This commodity is authentic and truthful to the best of the author's knowledge. Content is for informational or entertainment purposes only and does not substitute for personal counsel or professional advice in business, financial, legal, or technical matters.
© 2020 Eugene Brennan
Source: https://turbofuture.com/home-theater-audio/How-to-Upload-CDs-to-the-Cloud-and-Put-Your-Music-Collection-Online
0 Response to "How Do You Upload a Cd to You Tube"
Postar um comentário